In this KB we will explain how to disable the UEFI Secure Boot on your laptop and desktop before wiping your machine using BitRaser Drive Eraser software.
Secure boot is the feature of UEFI (Unified Extensible Firmware Interface), a firmware interface that replaces traditional BIOS and provides a standardized way for the operating system to interact with the hardware. It ensures that unauthorized applications do not get boot access.
The Secure Boot option offers protection against malware attacks like Rootkit, and Bootkit malware, prevents the installation of malicious programs that run before OS, safeguards the integrity of the boot process, stops corrupted components from loading, and more. On the other hand, Secure Boot also acts as a hindrance when installing custom or open-source operating systems like Linux-based software.
Note: While Wiping UEFI machines using BitRaser Drive Eraser software, Secure Boot prevents the execution of this OS-independent tool that attempts to load within the boot environment. Hence, we need to
DISABLE SECURE BOOT to load the
BitRaser Drive Eraser.
How to Disable Secure Boot?
The Secure Boot option can be disabled by accessing the BIOS SETUP when your device starts the boot process. For this KB we will share the steps to access and disable Secure Boot on a Dell laptop (Latitude 3410).
Step 1: Start your laptop, press the ‘F2’ key to go to BIOS Setup.
The procedure is similar to entering any machine. Just follow the onscreen instructions to enter the BIOS setup. The function keys may vary according to OEM.
See image 1 below of Dell BIOS Setup.

Image 1: BIOS Setup Menu Dell Latitude 3410
Step 2: On the top left-hand corner there is an option, ‘Advanced Setup’. Slide the button to activate it, turning it ‘ON’. Now click on ‘Boot Configuration’ on the left pane.
‘Secure Boot’ is now visible on the screen. In UEFI machines Secure Boot is enabled by default.
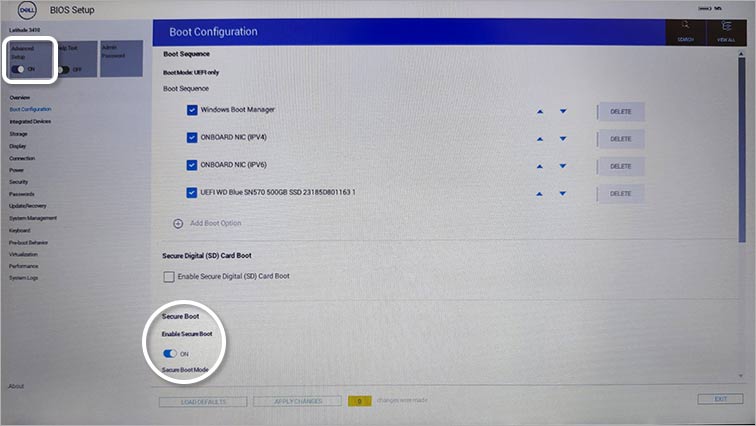
Image 2: BIOS Advanced Setup Secure Boot ON
Step 3: Toggle the ‘Enable Secure Boot’ button to ‘OFF’.
You will see a message, “Are you sure you want to disable Secure Boot?”
Click ‘Yes’. (Refer to Image 3)
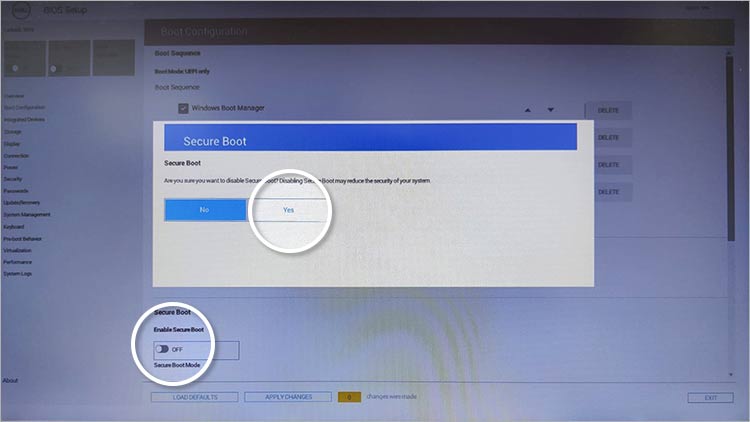
Image 3: Secure Boot Off Then Click Yes
Step 4: Now, click on ‘APPLY CHANGES’ at the bottom of the screen.
A window pops up, “Are you sure that you want to apply your changes?”
Click ‘OK’. (Refer to Image 4)
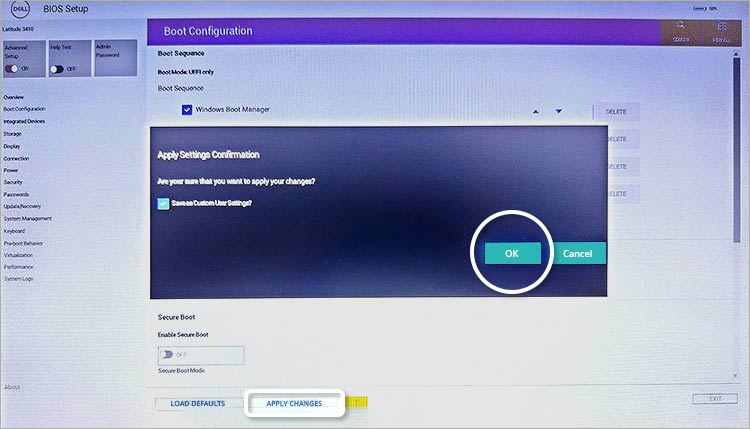
Image 4: Click on Apply Changes Then Click OK
The Secure Boot feature has been disabled on your system. Now you can boot your machine with BitRaser Drive Eraser software and begin the erasure process.
Steps to Perform Erasure After Disabling Secure Boot in UEFI machines.
- Download the BitRaser Drive Eraser ISO image file from the BitRaser cloud server and burn the ISO file to a USB to prepare your bootable drive using the Rufus app.
- Connect USB and Boot Computer using the BitRaser USB.
- Select BitRaser from the dual boot menu and press Enter.
- Once the application is loaded, Select the drive(s) that you want to erase.
- Select an ‘Erasure method’ as per your compliance requirement.
- Connect to Internet & BitRaser cloud account via the 'Settings’ icon.
- Start the erasure by clicking the ‘Erase’ button.
You can watch the video to learn how to wipe drives at internet-enabled locations:
https://www.youtube.com/watch?v=oDSEhQKNnBs
To wipe drives and devices at offline locations:
https://www.youtube.com/watch?v=moZW3L7AgPY
FAQs
What will happen if I disable Secure Boot? 
If you disable Secure Boot it will stop validating the signature of the software being loaded when the system is booting up.
When should I disable Secure Boot?
It should be disabled when installing software like BitRaser Drive Eraser which is OS-independent and works in a boot environment.
What are the disadvantages of enabling Secure Boot?
Secure Boot acts as a hindrance when installing custom or open-source software.
How can I disable Secure Boot?
Go to the BIOS Setup menu by pressing F2 (Dell) and select Advanced Setup. You can now switch OFF the Secure Boot feature.


