This KB article explains how to securely erase drives and devices, including laptops, desktops, and servers, using BitRaser Drive Eraser software with IEEE 2883:2022 Clear and Purge methods.
As storage technologies evolve, organizations must adopt sanitization methods that keep pace with modern devices. While NIST 800-88 has long been the reference point for media sanitization, the IEEE 2883:2022 standard provides updated guidance designed specifically for today’s storage media.
In this KB, we will erase the internal drives of a desktop using the Cloud Variant of BitRaser Drive Eraser software with the IEEE 2883 Purge method. The steps for erasing with IEEE Clear & Purge are similar.
Before starting, you must download the BitRaser Drive Eraser ISO file from the BitRaser Cloud Console and create a bootable USB using Rufus. For step-by-step instructions, refer to our KB: How to Create a Bootable USB Using Rufus?
Steps to Erase SSD & HDD with IEEE 2883:2022
Step 1: Plug the BitRaser bootable USB into the system containing the HDD/SSD you want to erase, and boot the system with BitRaser Drive Eraser (See Image 1).

Image 1: Boot Device Menu Asus Desktop, BitRaser USB Selected
Step 2: Once the device boots with BitRaser, the main software interface will appear (See Image 2a). From here, go to Settings and:
- Connect the system to the Internet via the Network tab (See Image 2b).
- Connect to the BitRaser Server to allow the application to access the BitRaser Cloud Console for fetching Erasure Licenses and uploading Reports/Certificates (See Image 2c).
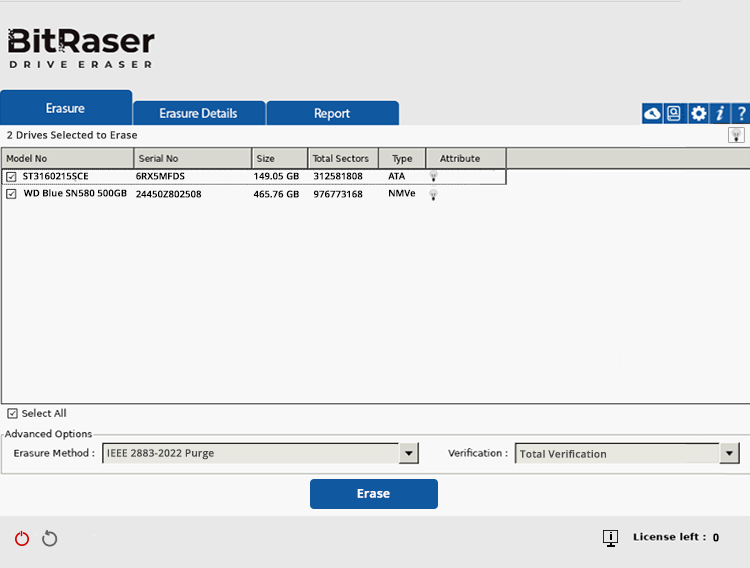
Image 2a: BitRaser Main UI with Connected SSD & HDD
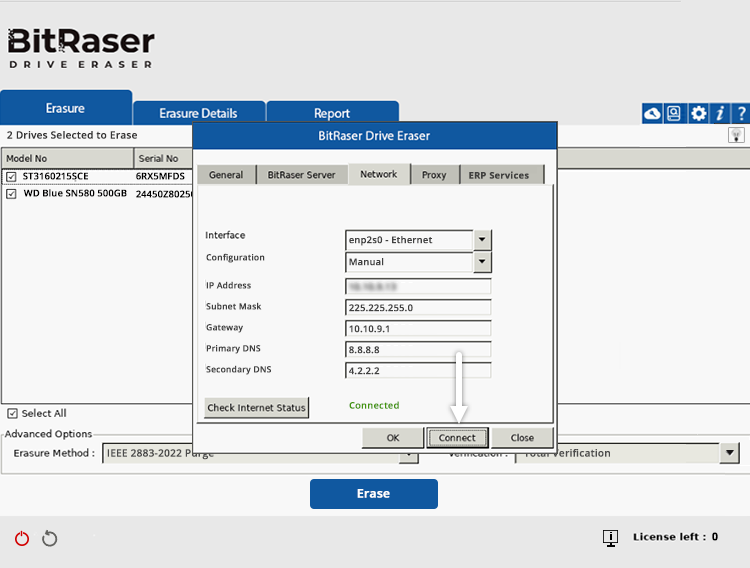
Image 2b: BitRaser Connected to Internet via Ethernet
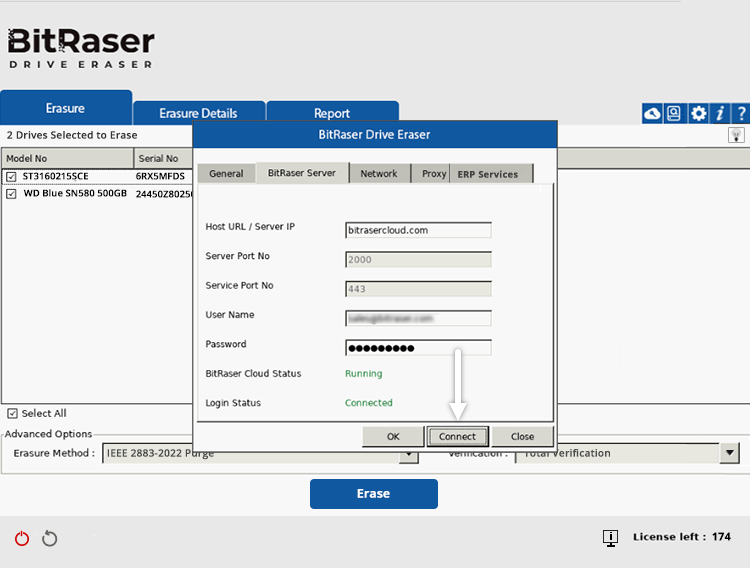
Image 2c: Drive Eraser Connected to BitRaser Cloud
Step 3: Once the application connects to the server, the license count will be updated and can be seen at the bottom-right corner of the UI.
From the ‘Erasure Method’ dropdown, select IEEE 2883-2022 Purge if it is not already selected (See Image 3). After that, select the ‘Verification’ type.
Note: You can pre-save the default erasure algorithm, verification type, and network/server credentials in the BitRaser Drive Eraser ISO file by using the BitRaser ISO customization feature. This not only saves time but also significantly automates the erasure process.
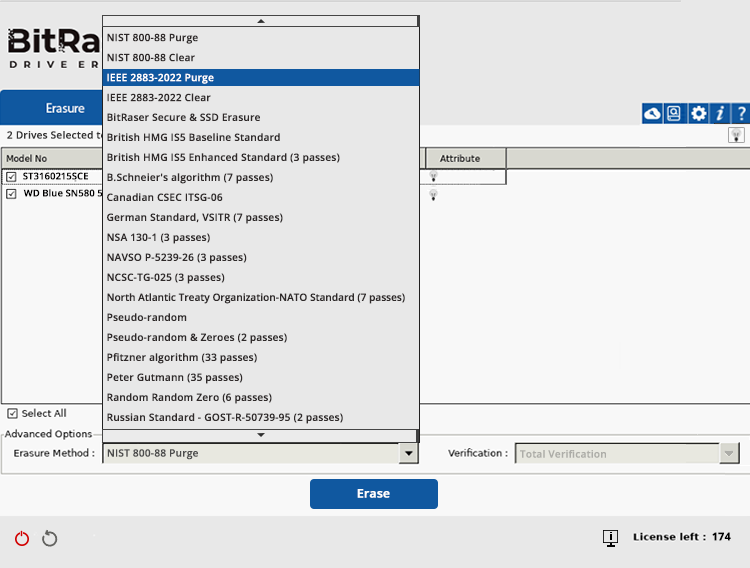
Image 3: IEEE 2883:2022 Purge Selected in Erasure Method
Before proceeding with erasure, it is essential to note that, according to IEEE 2883, complete storage sanitization requires clearing the Trusted Platform Module (TPM) chip, as it may store RSA keys and certificates. Therefore, if a TPM chip is present and enabled, it must be cleared before erasing the drives.
Depending on your system, three scenarios may occur when you click Erase:
Let’s see the steps required for each case.
The system does not have/support TPM
In this, erasure will be performed instantly on clicking the Erase button.
The system has a TPM, and it is Disabled
In this case, when you click the Erase button, a prompt appears informing you that a TPM chip has been detected but is disabled (See Image 4a).
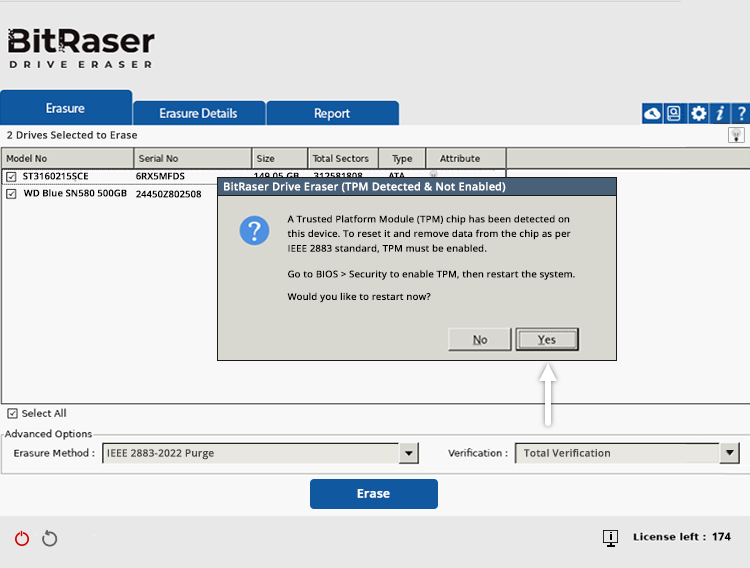
Image 4a: TPM Chip Detected & Not Enabled
For complete sanitization, the TPM chip must also be cleared (Data Removed). You have to manually enable TPM in the UEFI BIOS by restarting the system (See Image 4b).
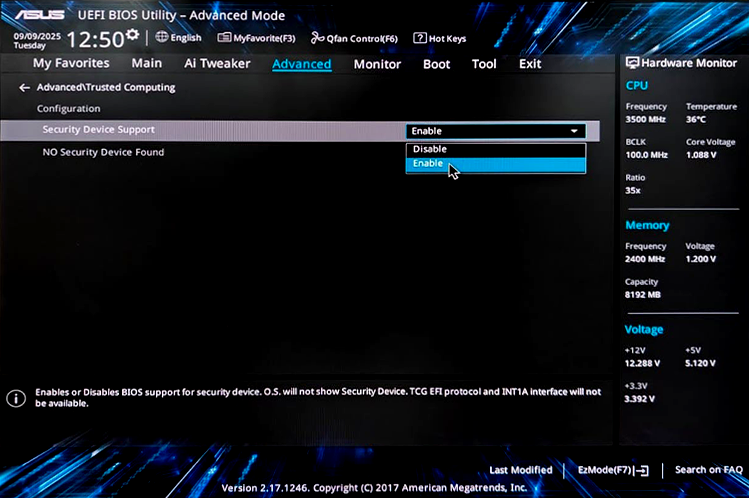
Image 4b: Enable TPM in Asus via UEFI BIOS
After enabling, restart the system with BitRaser Drive Eraser and continue from Step 2 onwards.
The system has a TPM, and it is Enabled
Here, when you click Erase, a prompt appears stating that a TPM chip is detected and enabled. The device must restart to clear the TPM.
Select ‘Yes’ to restart (See Image 5a).
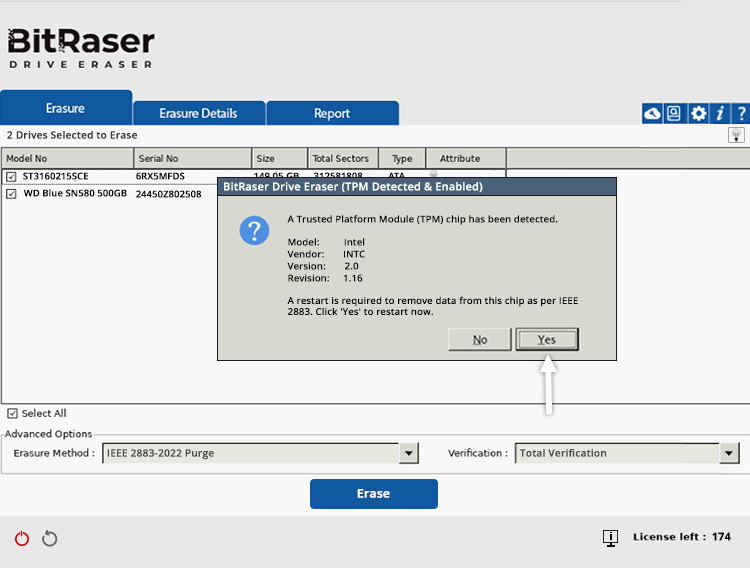
Image 5a: TPM Chip Detected & Enabled
After the restart, you will see a screen confirming that a TPM clear request has been received. Press F12 to clear the TPM (See Image 5b).
The key to clearing TPM varies according to the device manufacturer; read the instructions carefully on the screen to clear TPM.
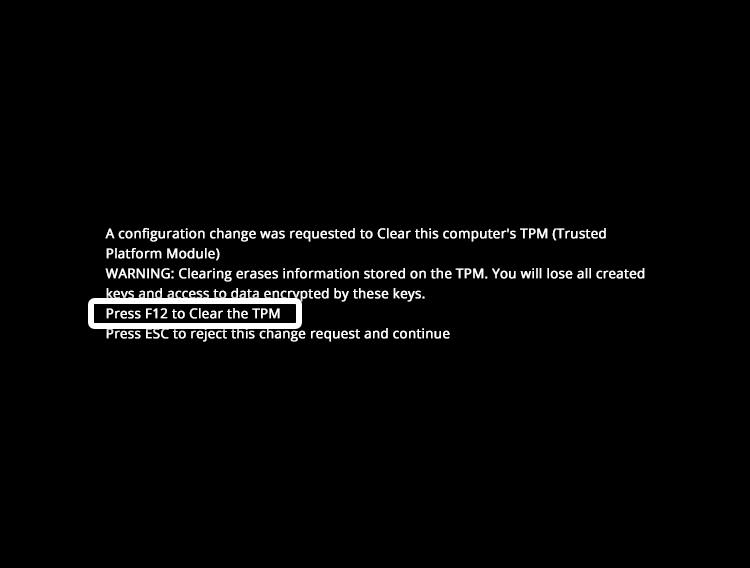
Image 5b: Clear the TPM Chip
Step 4: Once the TPM is cleared, the device reboots with BitRaser. You must redo the steps from Step 2 to connect the application to the Internet and BitRaser Server. Then click ‘Erase’ to begin.
A confirmation prompt will appear; select ‘Yes’ (See Image 6).
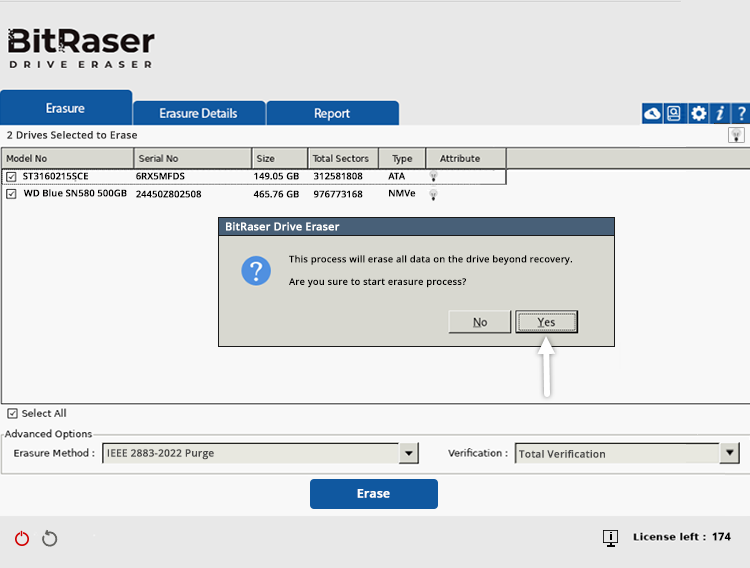
Image 6: Confirm Erasure Process with IEEE 2883:2022
The application will then prepare the disk and initiate the IEEE 2883 Purge erasure process on both drives (See Images 7a and 7b).
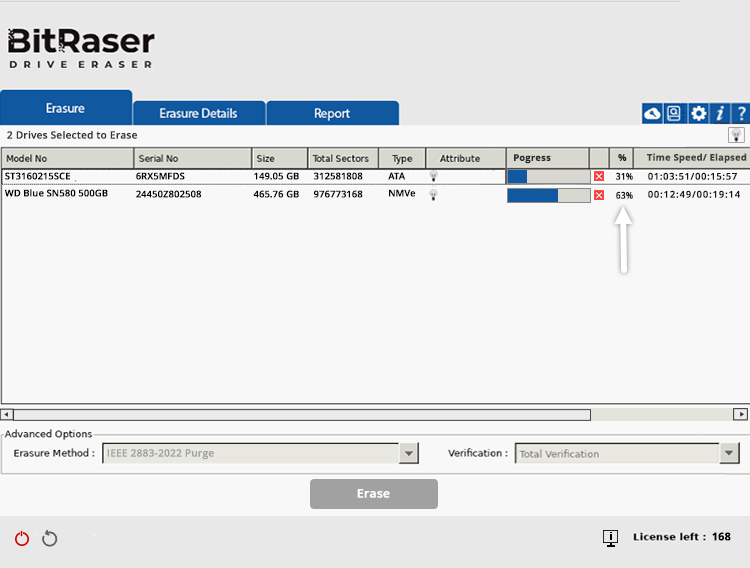
Image 7a: Erasing HDD & SSD with IEEE 2883 Purge
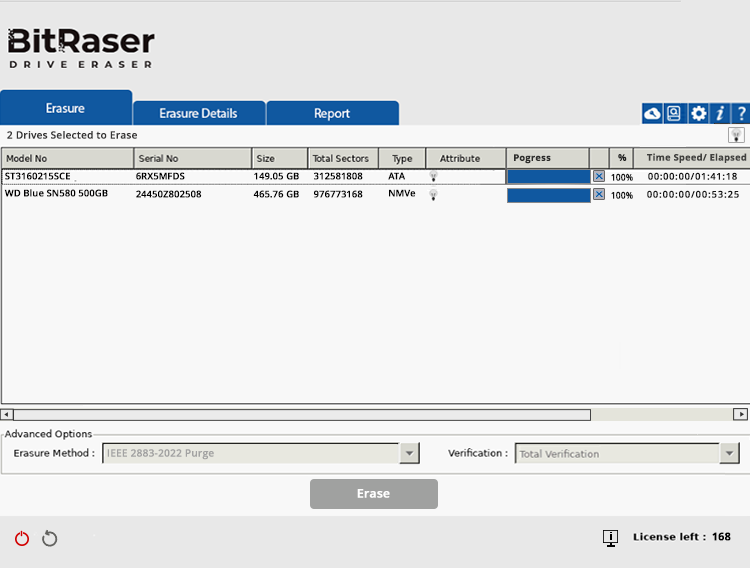
Image 7b: IEEE 2883:2022 Erasure Completed
When the process is complete, a tamper-proof erasure report is automatically generated and saved in your BitRaser Cloud account (See Report Below).
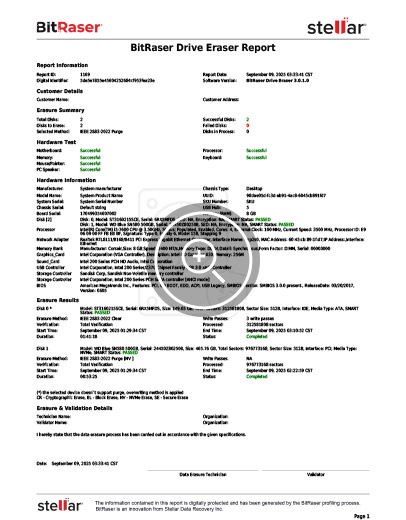
Report: BitRaser Drive Eraser IEEE 2883:2022 Erasure Report
You have now successfully erased your SSD & HDD using the IEEE 2883:2022 Purge method with BitRaser Drive Eraser.
Important: The IEEE 2883 standard does not mention erasure protocols for emerging storage technologies. Refer to Annexure C on Page 63 to see the list of technologies not supported by the standard, such as HAMR (Heat-Assisted Magnetic Recording), MAMR (Microwave-Assisted Magnetic Recording) drives, DNA storage, persistent memory, and holographic storage. For such modern technologies, organizations should refer to the manufacturer's guidelines to sanitize the storage media.


